Setting the Height of a Rack Properly
Many athletes have access to cages/power racks with at least 2” x 3” uprights for their weightlifting training. Such racks were a great invention and combined with 1” diameter round pins (or other mechanical spotters that are similarly sturdy), they are a boon to training safety when squatting, benching or incline pressing, and performing many other exercises, especially when one is training alone. However, such racks, as standardly made, should never be used for snatches, cleans or jerks (we do have specially modified cages in our gym that do enable lifters to perform these lifts safely and effectively within the confines of those cages, but that is not typically the case).
Sturdy cages and power racks are great because of their versatility but also because they offer pretty much fool proof spotting and weight racking. Assuming the racks are secured fully to the floor, they won’t move if you inadvertently push against them, such as when you return the barbell to the rack. And the spotting safety they can provide is unmatched, as long as you make sure your hands are nowhere near the rack’s uprights or spotting pins during a lift and when you are returning the barbell to the rack after a successful lift.
You also need to be sure that when you set the height of the spotter pins they are just slightly below the lowest point you will reach at your lowest point in a correct lift, so their spotting protection will come into play as soon as a miss occurs – not after the bar falls several inches. This serves to protect both you and the equipment.
So power racks or cages should be your first choice for safe squatting, benching and similar exercises. They are particularly essential for bench pressing, where unless you have spotter pins, there is nothing to reliably protect your chest, neck and head from a falling bar – particularly important body parts to say the least!
However, many lifters will find they don’t have access to a cage or power rack when they are squatting. In such a case they typically resort to portable squat racks, which are present in most gyms today and are very common in gyms focused on Olympic-style Weightlifting, CrossFit gyms and other such training centers. While some such racks can include spotting devices of various types, they are invariably not as safe as the kind of spotting provided by a cage/power rack.
So what if a power rack or cage is not available, and you choose to use portable squat racks instead? How can you use them as safely as possible?
The Basics of Using a Portable Squat Rack Safely (Some of Which Are Useful For Power Racks and Cages As Well)
There are several basic rules for using a squat rack safely and effectively, regardless of what kind it is. First, set the pins/hooks that will be used to support the bar before and after the squat at a height that doesn’t make it hard for the lifter to take the bar from the rack or replace it when a set is over. This is accomplished by satisfying two tests.
First, the bar must be high enough so that the lifter will only have to use a between 1/4 and a 1/8 squat to get the bar off the rack. However, care must be taken to assure that when the lifter straightens the legs the bar will not be so high that it can come near going over the top of the back of the rack, when the bar is placed back on the rack after a set has been completed.
Most racks (and all good ones) have two sort of “J “ shaped hooks at the top of each side of the rack, so that the hook that supports the bar when it is on the rack has the low part of the J nearest to a lifter facing the rack, and the high part of the hook at the back of the rack. This way the lifter will not cause the bar to contact the rack’s low hook side when the bar is taken from or returned to the rack. But the higher part of the hook, if set at the right height, will prevent the bar from going past the stem (higher part) of the rack’s J hook, when the barbell is replaced on the rack.
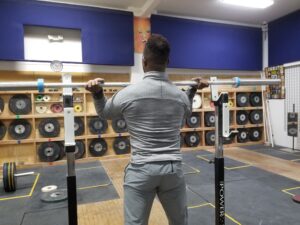
The picture below shows the rack height correctly set, such that the lifter (who is standing with his legs straight in this photo) has the bar below the back part of the hook yet above the front (lower) part of the hook.

A Rack Height That Is Appropriate For This Lifter
With this rack height, the lifter is free to step forward to replace the bar on the rack by having it contact the rear part of the hooks on both sides, then gently lowering the bar until it is in contact with the bottom of the hook, where it will neither roll off the front nor back of the hook. Alternatively, the lifter can step back to clear the rack and begin a front squat, without contacting the front of the hook, so that he can lower himself into a squat (the extra set of lower hooks shown are not a characteristic of most racks but must also be cleared in order to begin the squat).
This structure has a very important additional benefit. It enables the lifter to replace the bar safely on the rack without looking at either side of the hooks, to see whether the bar is inside the hook. Instead, the lifter can very gently touch the back (higher side) of the J hook on one side and then the other (while keeping the first side against the upright on its side). Then gently let the bar slide down the back of the hook into the bottom of the hook. I call this the bar contact with the rack method.
Using this contact method, rather than trying to replace the bar on the rack by looking at the bar and back of hook on one side at a time, because this avoids a common problem with sight based bar replacement. Some lifters using their eyes to help them place the bar on the rack will make visually guided contact on one side, but then focus so much on achieving contact on the other side that they will actually let the side where original contact was made to come back out of the hook on that side, while they are focusing on the other side.
You generally can’t see both sides of the rack at the same time when you are replacing the bar on it after a back squat, as you are forward of the bar and your peripheral vision may not permit you to see both sides of the bar clearly.
In contrast, you can definitely feel the bar contact the rear sides of both hooks at the same time. Indeed you must, in order to be safe. Using this contact method works equally well for power racks and cages. However, one must be sure that when a portable squat rack is being used only gentle contact is made with the back wall of the hook. Pushing hard against it could cause the rack to tip back, permitting the bar to go past the back side of the hook, or tip the rack back enough for the rack to tip over backward.
Instead, once you feel firm contact with the backs of the J hooks on both sides, you simply and gently slide the bar downward until it is sitting at the bottom of the hook. Only at this point is it safe to give up contact with the bar and step backward away from the rack.
When you are using a portable squat rack, especially with a weight that is heavy for you, you should request the assistance of knowledgeable spotters. Their assistance can help to assure that, should you miss a squat for any reason, the spotters will check the downward progress of the bar, and help you either return the bar to the racks, or place it safely on the floor. If you want to learn how spotters should work, particularly when spotting a back squat, please to our Safety section of our blog, in the article “A Better Way To Spot Squats”.

