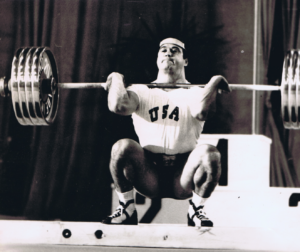
World Record Maker Frank Capsouras at the 1969 World Championships
I’ve found that quite a few Weightlifting newbies, and even veterans, have trouble “racking “a barbell (placing it comfortably and solidly on their shoulders for a clean, front squat or jerk), especially with their fingers encircling the bar fully – a very important element of good clean technique). Many lifters can’t get their elbows up to shoulder level (which is really a must for safety and to help assure one isn’t turned down in a competition for touching one’s elbows to one’s knees or thighs).
Others find that they can they can get their elbows to the desired height, but if they do so they experience pain in in their wrists or elbows, or feel they are choking themselves (and in some cases they may actually be doing that). This can all be fixed and fixed relatively quickly, with the Ritzer stretch (named after the man who invented it – as far as I can tell).
Many fixes have been offered to address the abovementioned racking problem, but I’ve never seen one that beat Dr. Ted Ritzer’s. More importantly, I’ve never seen anyone who couldn’t develop the ability to hold their elbows high in the clean with reasonable comfort and fully closed hands, if that person diligently applied the good doctor’s treatment for their inflexible elbows condition. It’s simple and it always works.
The History of the Ritzer Stretch
Ted taught his stretch to me nearly 60 years ago, in part so that I could help him with it (it’s a stretch best done with a partner). Little did I know that by becoming his elbow stretching partner I’d learn one of the most important stretches I’d ever use in my coaching career. If you want to learn more about the evolution of the stretch, please read the next four paragraphs. If you simply want to learn how to do it, please skip to the ‘How To Do the Ritzer Stretch” section below.
How I Became Ted Ritzer’s Stretching and Training Partner
I first started training in a “real” weightlifting gym (Lost Battalion Hall in NYC) in January of 1966. I’d been weight training on and off for nearly 5 years in a home gym before that, and had gotten fairly strong relative to my school mates. At the age of 15, a was pressing 75 kg., snatching just over 60 kg. and cleaning and jerking about 90 kg., at a bodyweight of about 67 kg.
But at Lost Battalion Hall (LBH), I was pretty low in the pecking order. Almost everyone there could out lift me, many by a huge amount. What’s more, my technique was certainly nothing to brag about. Learning to lift alone in my basement, having only still photos for examples of good lifting technique (there were no consumer level videos in those days and YouTube was decades away from being invented). This left me with technique that, if you had categorized it as being “crude”, you would have been offering a kindly evaluation.
It was a couple of weeks into my membership at LBH that I ran into someone who would change my life forever in many ways – Theodore Ritzer. He was about four years older than me and about 7 kg. heavier. He worked hard on all his lifts, and was Jr. National (then called Teenage National) level. However, he was especially good in the press (still one of the lifts in all Weightlifting competitions until 1973). The first time I trained with Ted, he out pressed me by about 45 kg.! To say I was in awe would be an understatement!
Observing him carefully throughout his training session, I noted the considerable amount of time he devoted to stretching, apparently with good results – he could do a full split after all. But one of his key areas of focus was in stretching his elbows, so that he could get them well up in the clean. This had been a problem area for him, until he devised a stretch specifically designed to allow him to rack a barbell properly. It was a stretch so simple it was hard to understand why no one else had ever thought of it.
Ted would never begin his workout without doing that stretch. He told me that, before he invented it, he couldn’t rack a bar correctly or comfortably. After doing his stretch, which generally took less than a minute to carry out, he was good to go. What exactly is this miraculous stretch?
How To Perform The Ritzer Stretch (RS) 1.0
In order to perform the RS, you need a bar and a power rack or cage, to support the bar at the necessary height for the stretch. If have a cage or rack with 1” holes that run side to side, a 1” bar that is all you need. If your rack/cage only has holes that run front to back, you’ll need a bar loaded to 60 kg. or more loaded on the rack, with the bar set at a quarter squat height. We’ll refer to the point where the bar contacts the rack and its hooks or pins as the “front” of the rack.
Once the bar is set, the lifter gets into a front quarter squat position while facing the front of the rack, with the fingers wrapped fully around the bar (the bar should be resting against upright that supports it). The lifter is of course facing the bar but –standing behind it (so the lifter’s neck, and rack’s uprights’ are behind the bar).
The lifter begins the stretch by raising the elbows as high as possible without significant discomfort. At this point, the palms of a partner’s hands are placed under the athlete’s elbows. The partner pushes up on the athlete’s elbows, gently and gradually, raising the athlete’s elbows higher than the athlete was able to accomplish unassisted.
In Ted’s version 1.0 of this stretch, he had me raise his elbows as high as possible, without undue discomfort, and hold him in that position for a few seconds. Usually that was all that was needed to achieve the elbows slightly above the shoulders position he was looking for.
Once the elbow height reached on a given day exceeded that of the shoulders, Ted was pretty much good to go. If he couldn’t achieve that height on the first stretch, he’d have me repeat the stretch once or twice (it never took more than three to get the height he wanted and we often got it on the first stretch). Only then was he ready to begin his workout with the weights.
The Evolution of Ritzer 2.0 – An Even Better Way To Loosen The Elbows
We used elbow stretch outlined above for Ted for years, and we happily taught it to others who were having trouble getting their elbows up in the clean and front squat. It enabled virtually everyone who did the exercise regularly, generally for a few workouts, to achieve a solid rack position, with the elbows at shoulder height or above. However, using the partner assisted stretch method alone I ran into an occasional person who, despite having seen improved mobility by using the stretch, never seemed to get an ideal elbow position. So I searched for ways to make the Ritzer stretch more effective.
Then I learned about proprioceptive neuromuscular facilitation (PNF) stretching. It seemed ideally suited for use in the Ritzer stretch, especially for those who were having trouble with the rack position using traditional partner assisted stretching alone. The first time I tried it on such a person it worked like a charm. This athlete had never been able to rack the bar ideally, but after a few PNF sessions his elbows were fine.
PNF can be done it several ways, but it basically involves having the athlete and/or the partner stretch an athlete to the furthest point that can be reached without discomfort, then having the athlete push back against the partner while the partner resists, such that the pushback is an isometric contraction (the muscles are exerting force but the elbows are not moving downward). After a few seconds, the athlete relaxes, then tries to stretch further (raise the elbows higher), with or without the help of the partner. Almost inevitably the athlete gets those elbows higher than was achieved the first time, with no major discomfort.
Once that point is reached, an isometric contraction in this elbows higher position is executed. This overall process is typically carried out 3 times, but I’ve sometimes done it up to 5 times. In my experience, the inevitable result is being able to reach significantly higher elbow positions than were previously achieved with a standard partner assisted stretch, and without significant discomfort.
However, for that to be true on this particular stretch, it is very important the bar be positioned correctly. That means two things. First, the bar must be resting on, and fully supported by, the shoulders – not pressing against the neck (touching the neck lightly yes, but not pressing against it). Failing to keep the bar from pressing on the neck can, in some cases, result in the lifter becoming light headed, much as could happen if a lifter racked a clean with the bar pressing against the neck and then tried to jerk it (you’ll see some lifters dropping the bar after a successful clean because they are experiencing this problem). In contrast, if you keep the bar supported on the tops of the shoulders, but not pressing against the neck, any lightheadedness will be avoided.
Second, the shoulders much be held sufficiently high to assure that the bar does not contact the lifter’s clavicles (aka collar bones). Holding the bar in this position will protect these bones, which are not made to support heavy barbells.
The Dr. Ritzer 3.0 Improvement
An age old adage says that “necessity is the mother of invention”. This was certainly true with the Ritzer stretch. We’d been coaching for years and using Ritzer 2.0 with great success for those who needed it, and had begun to refer to it as the Dr. Ritzer stretch. This is because Ted had gone on to earn his Ph.D. in physiology of exercise, then an MD, and a Board Certification in Cardiology by this time – so we thought adding the “Dr” to his name was appropriate (at the time he was unaware of my changing his stretch, or the name of it).
It was at this point I met Peter Nickless (before he became Dr. Nickless). Pete had been a high level powerlifter before he started working with me to learn Olympic style lifting, and he was very strong. He weighed about 195 kg. (430 lb). when I met him. His arms measured more than 25” around. Not surprisingly, he was having considerable trouble racking a bar in the clean, or for the front squat.
While I was confident that using the Ritzer stretch would work for Pete, a problem arose for me in stretching him. Up until this point in my coaching career, I’d have a lifter doing the Ritzer stretch rack the bar in the aforementioned 1/4 squat position, simply getting the elbows in the correct position and then having the lifter push downward against my hands during the isometric phase of the stretch. I was still military pressing 100 kg. at the time, so was strong enough to partner with anyone else I’d met to date. But Pete was so big and strong that I had trouble holding his elbows in place during the isometric phase of the exercises. I could do it, but it was quite a challenge.
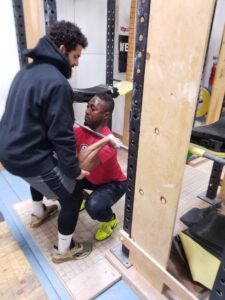
Not wanting to suffer while stretching someone, and wanting to have a method that could be used even by a much weaker partner, I came up with the idea of having Pete set the bar at the height of his full front squat position for the stretch. Then he’d get into the full front squat position and I’d place my hands under his elbows and my thighs under my hands. In this position, I was able to use my legs to resist his isometric contraction. No matter how hard he’d push he couldn’t move me (and the level of strain I experienced was quite acceptable).
In reality, there is no reason to push the isometric effort to the max to benefit from it (you do need to exert some effort to trick the muscles into relaxing subsequently – but you don’t have to go all out). However, I liked the idea of coming up with an approach that would permit any partner to work with any athlete, almost no matter what their strength difference was, and this was it.

In the photo above photo, version 3.0 of the Ritzer stretch is being applied. Note the partner’s palms (only the partner’s right palm is visible but the left one is doing the same thing on the opposite side) are cupped under the lifter’s elbows and the partner’s thighs support the palms. Note also that the bar is resting on the lifter’s shoulders but not pressing on the neck – simply touching it lightly. The lifter’s hands are fully closed around the bar. The position we are shooting for is one where the bottoms of the elbows are slightly above the tops of the shoulders (a little higher than is shown here). Such a position with a closed grip makes for an incredibly solid racking position that both prevents the bar from rolling down the shoulders, and keeps the elbows well above the knees and thighs, so that there is no chance of the lifter making contact with them – a action that is both unsafe and reason for a clean to be turned down in a competition.
Making the Dr. Ritzer Stretch “Portable”
While we’d fixed Pete Nickless’s elbow stretching problem in the gym, we ran into a problem with warming him up in a meet, since often no fixed racks were available there. After some experimentation, we came up with an approach that worked well, but it did require two partners, at least for someone as strong as him.
We’d have Pete clean 60 or 70 kg. and stand with the bar on his shoulders. We’d then have one partner hold his left elbow and the other partner hold Pete’s right elbow. He’d put one foot forward and the other back to get into a high split position.
We had him do this so if the assistance of the partners caused any backward force he could keep his balance. We’d then carry out the stretch in the normal way, but having the two partners look at each other as well as Pete was necessary to make sure they were lifting his elbows to the same height at the same time, and were beginning the isometric/further stretch parts of cycle at the same time.
Apart from the disadvantage of needing two partners for this version of the stretch, we found this version of the stretch worked very well. Pete could get his elbows just as mobile before a meet as he could using a fixed rack and one partner in the gym. Hooray!
I want to close by thanking Dr. Ritzer for his brilliant and simple invention, as well as the athletes over the years who have helped us to refine the Ritzer technique and make it more robust.
Happy stretching and racking the bar – don’t accept less that a perfect rack – one where the elbows are high, the hands fully closed around the bar and the bar supported by the shoulders but not pressing against the neck!

